MSP360 Products
MSP360 Managed Backup Web Console Overview
This guide will overview MSP360 Managed Backup Web console, each of its tabs, most popular features, and tips and tricks.
Dashboard

Dashboard is the home section of the MSP360 Managed Backup web console. On this tab, you can see the summary of your activity within MSP360 Managed Backup. Here you can track the backup size for the last 6 months, view current status of backup plans created, the total storage size used, information about licenses and status of the endpoints connected to MSP360 RMM.
Backup Tab
On this tab, you can administer all endpoints with MSP360 Managed Backup agents.
The Computers section allows you to manage all your computers in a single pane of glass. Here you can create, modify, and delete backup and restore plans, see the current status of plans, track the disk space, and CPU and memory usage. The next section, Monitoring / History, stores information about all the backup and restore plans. To access all the remote backup management features, go to the Remote Management tab.
To start working with backup plans, click the endpoint name or select the icon with three dots in the Actions column and click Show Plans button. Click the Add New Plan button, select the required backup type from the list and follow the wizard to create the plan.

The next section, Storage Accounts, allows you to create, edit and manage your storage accounts and storage limits. After the initial sign up, you get Amazon S3 integrated storage with Unified Billing and 1 TB of free trial storage for 1 month. To add another storage, click Add Account and follow the wizard.

M365/Google Backup Tab
MSP360 Managed Backup allows you to back up the cloud email environments of your customers, including the most popular solutions: Google Workspace and Microsoft 365. You can back up and recover Mail, OneDrive, Contacts, Calendars, SharePoint and Teams.
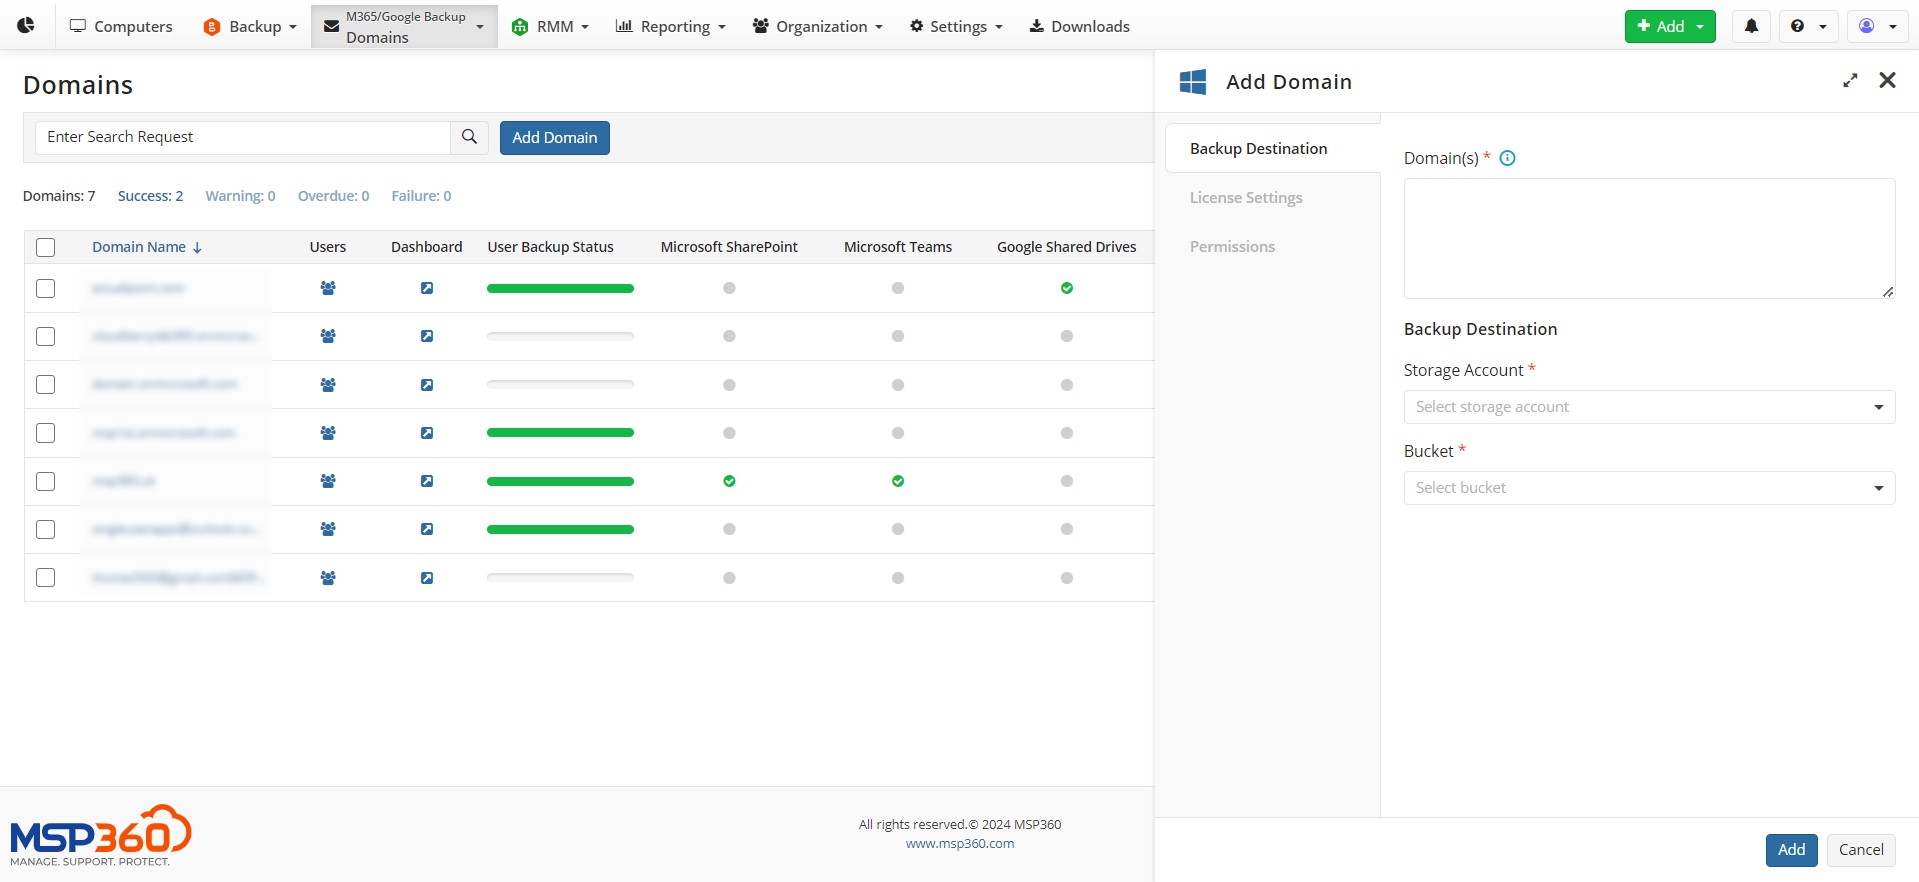
To start working with Microsoft 365 or Google Workspace backups, go to the M365/Google Backup tab, General section, and start configuring your access panel. In the Domains section, you can add a new or edit an existing domain.
RMM Tab
This tab shows you general information, such as the computer name, disk, CPU and memory usage, and warns you if you have any available updates for your operating system or antivirus, or event log issues.
To manage a specific computer, click on the diagram button in the right corner of the RMM section, or any of the status bars.

In the RMM tab, you can execute Group Actions to perform required actions on multiple endpoints in bulk. The following actions are available for Windows devices:
- PowerShell script execution
- Uninstall software
- Install Windows updates
- Windows update policy
- Install or update software (New)

Reporting Tab
The Reporting tab gives you an overview of various aspects of your MSP360 Managed Backup usage and allows you to create and customize reports.

The Plan Report Settings section allows you to customize your per plan backup and recovery notifications. This feature works well for a small number of users and endpoints. If you have more than ten machines, we recommend using scheduled reports instead.
Scheduled Report is a flexible feature that allows you to create group reports about backup and recovery plans, licensing, storage usage, and backup history. To configure reports, click the Add Report button in the upper left corner.
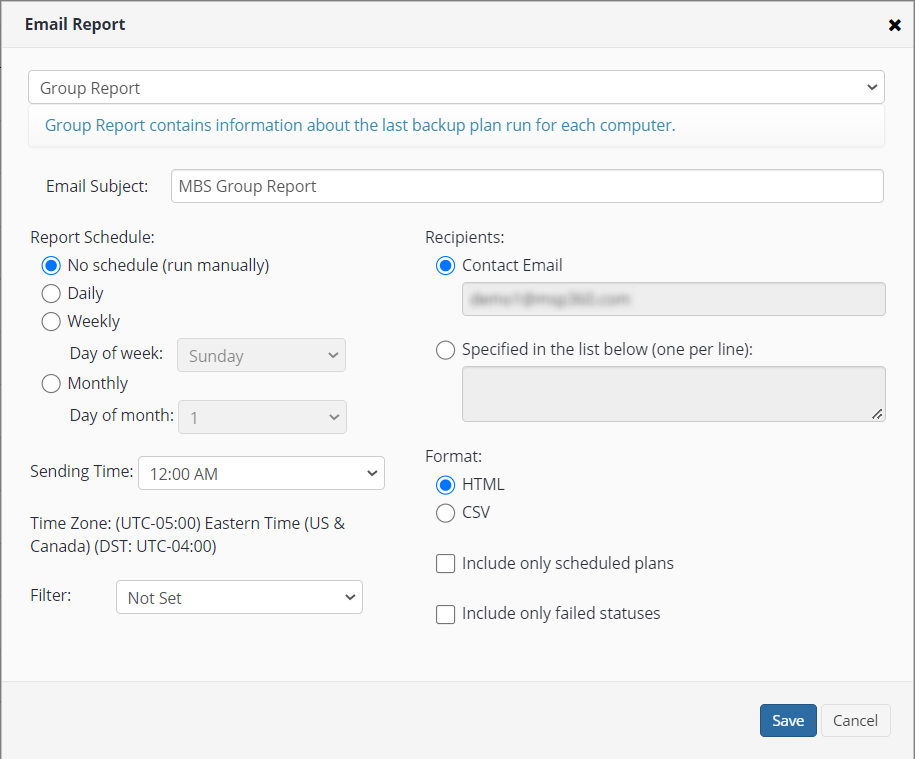
Here you can also create scheduled reports for RMM.

Organization
On this tab, you can create and manage users, companies and administrators, track all the licenses you currently manage, see the purchase history and monitor the Management Console activity.
Users Tab
To create a new user, go to the Users tab and click Create User in the upper left corner. Disable sending email instructions, unless you want your users to do their own setup. To simplify license management, it is advisable to accept the default settings and allow users to activate licenses from the Global Pool.
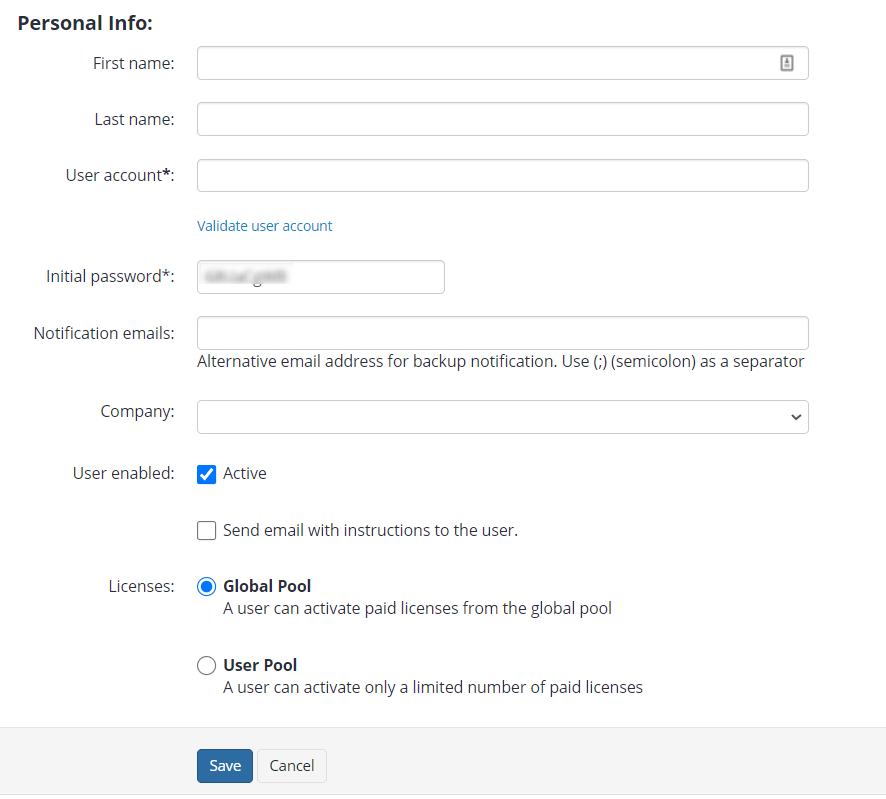
To edit the user account, find the required user on the list and click the Edit button on the right. If you need to view the statistics, click the Monitoring button to see the backup plans created.

Licenses Tab
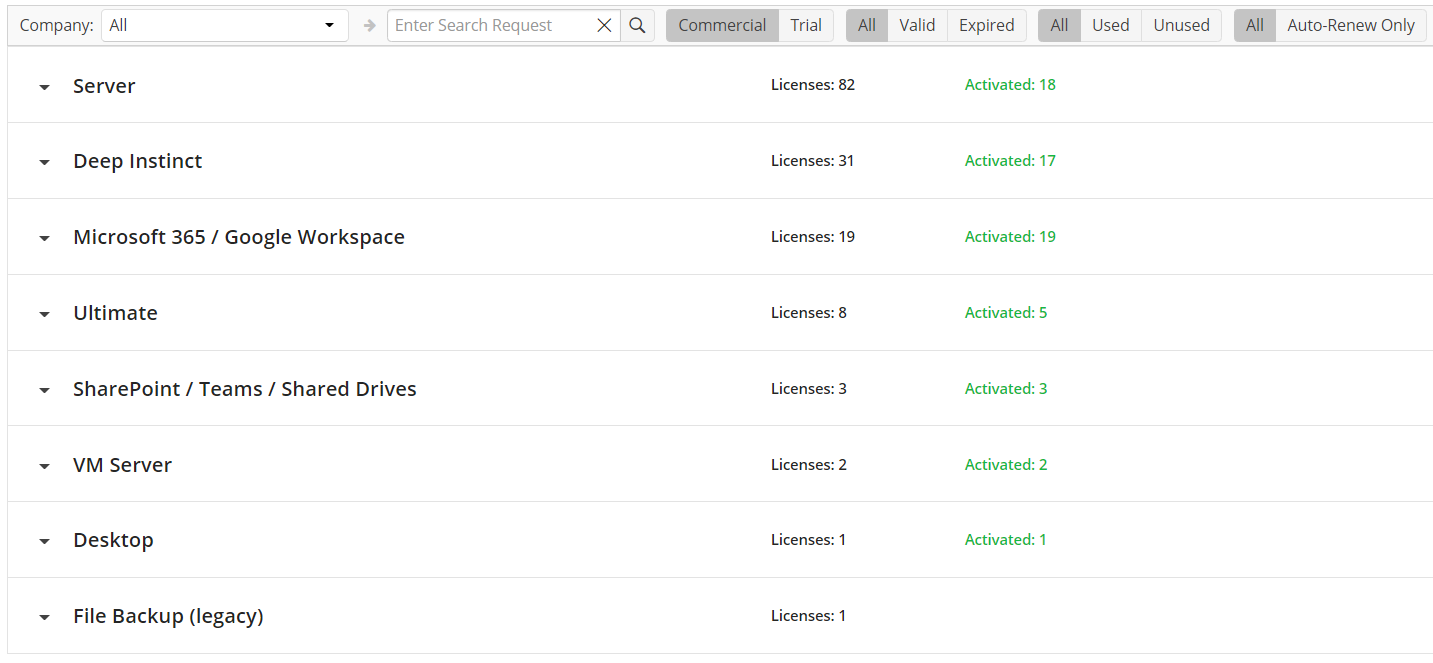
To start working with licenses, go to the Organization tab, Licenses section. You will see an overview of all the licenses you currently manage, including trial and activated ones. Here you can purchase, activate, renew and release licenses from users.
Companies Tab
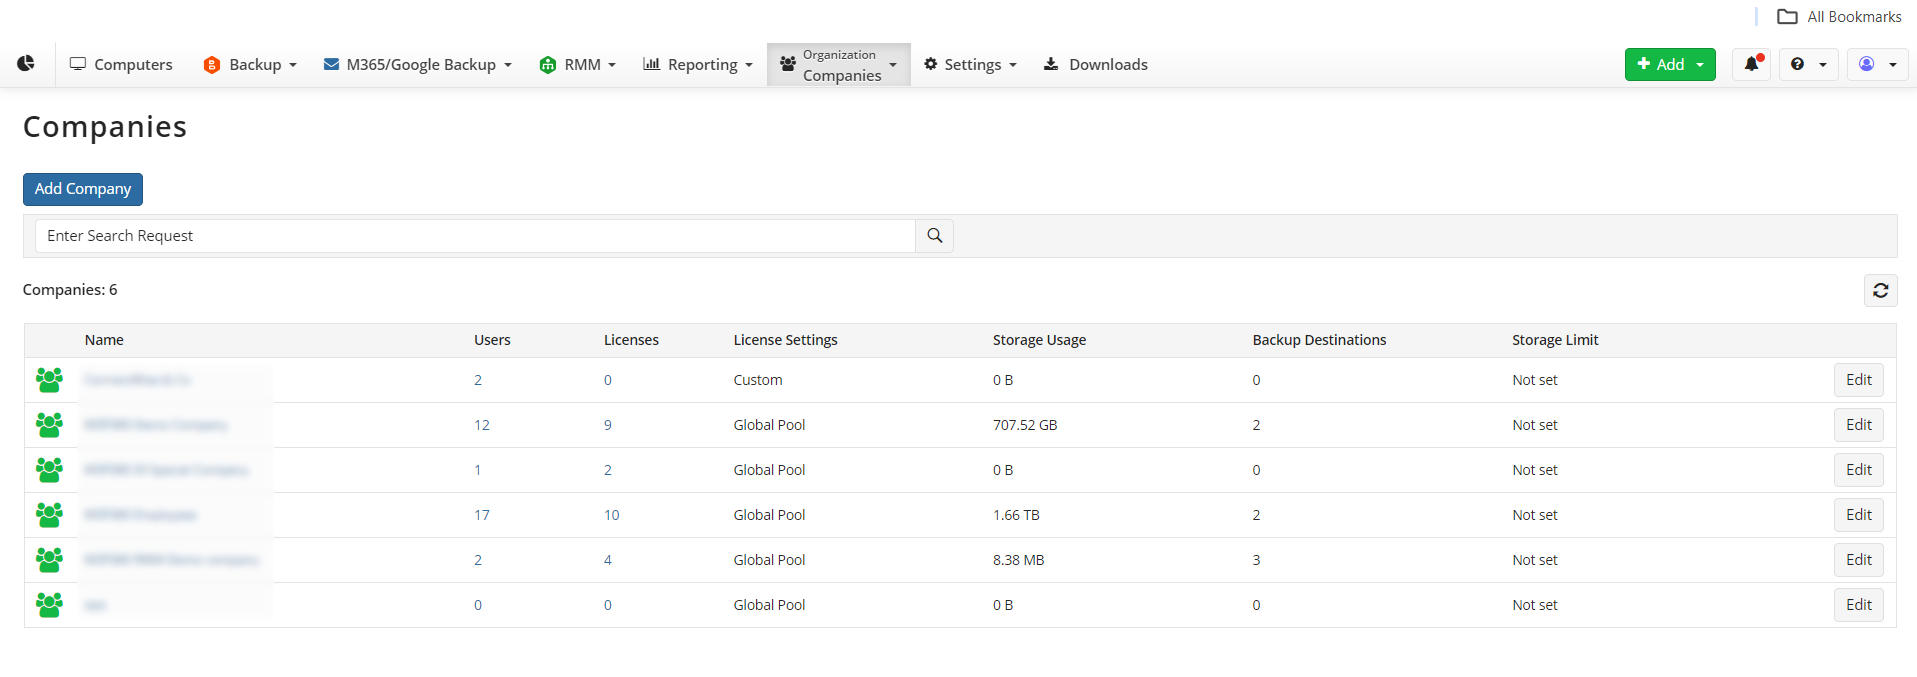
To create or edit a company, go to the Organization tab, Companies section. If you manage lots of users, it is convenient to group them into companies to simplify reporting, billing and license management.
Administrators Tab
The next tab, Administrators, allows you to create admins with granular access to the MSP360 web control panel. Click the Add Administrator button and in the slide-in that appears select Permissions to lock the admin access to the specific functions. Proceed to the next section to specify a company for the administrator if you need them to manage a specific company only.

Audit Log Tab
This section keeps records on who logs into the MSP360 Managed Backup console (IP-address), when and what they do here. For security reasons, it is worth checking the Audit Log from time to time.

Settings Tab
In the Settings tab, you can edit general information, switch time zones, modify security settings, set up backup and recovery plan notifications. We strongly recommend enabling two-factor authentication in the General section. Another helpful security feature, IP Allowlisting, can be enabled under the corresponding tab.
Additionally, here you can create your own branding to personalize your services for the endpoint users. This can be done in the Branding section.

Downloads Tab
On the Downloads tab you can download software packages, to install them on the endpoints. In the slide-in that appears, you can download the build on your own computer, copy the installation link and send it to another endpoint or copy the PowerShell installation script.

Here you can also find the MSP360 Network Discovery Tool, which serves as a valuable asset for bulk deployment of backup, remote monitoring and management (RMM), and Connect agents.

Conclusion
MSP360 Managed Backup. Simple. Reliable. If you have any remaining questions or would like to learn more, please contact our sales team.
