Discover the best Cloud to Cloud Backup Solutions for Microsoft 365 in 2026. All vendors providing a cloud to cloud backup solution for Microsoft 365 are included in this roundup. Cloud to cloud, as used here, specifically refers to solutions that back up Microsoft 365 data using Microsoft APIs, storing it separately from the production tenant, and that do not require any customer-installed backup servers or infrastructure for the Microsoft 365 workload. Vendors are included if they have a cloud to cloud backup solution for Microsoft 365, regardless of their overall platform's design or lineage.
MSP360 Backup for Microsoft 365 / Google Workspace 4.9
In release 4.9, MSP360 Backup for Microsoft 365 / Google Workspace introduces shared mailbox licensing that aligns directly with Microsoft’s model. The update removes unnecessary backup licensing for shared mailboxes that Microsoft itself allows to operate without a license, improving MSP360 pricing transparency.
A Step-by-Step Guide on How to Backup Outlook Contacts
A comprehensive guide on how to backup Outlook contacts using manual as well as automated approaches. This article also explains how to restore contact data in Outlook, as well as troubleshooting the backup and recovery process for Outlook contacts.
Roles and Permissions in MSP360 Backup for Microsoft 365 and Google Workspace
This guide explains the types of roles and permission levels in MSP360, how they function across two services — MSP360 Backup for M365 / Google and MBS (Managed Backup Service) for M365 / Google — how to delegate access securely to admins and end-users, and which common mistakes to avoid during configuration.
Continue reading
Set up MSP360 Managed Backup for Microsoft 365 and Google Workspace
With MSP360 Managed Backup for M365/Google, you can back up and recover emails, files, and other services under Microsoft 365 and Google Workspace accounts. This guide will help you prepare to back up your data: purchase licenses, set up storage destinations, and configure your MSP360 account.
Note: MSP360 Managed Backup for M365/Google is built for centralized backup of multiple domains — ideal for MSPs, resellers, and IT teams managing several organizations. For a single domain, use MSP360 Backup for Microsoft 365 / Google Workspace — a simpler solution for individual use.
MSP360 Managed Backup for Microsoft 365/Google Workspace is suitable for three types of users. Understanding your kind helps determine how you purchase licenses, manage backups, and interact with the platform.
- Managed Service Providers (MSPs)/Resellers: Companies that offer managed IT services to other organizations and users.
- Businesses (Non-MSP/Reseller): Organizations using MSP360 to protect their Microsoft 365/Google Workspace environments.
Note: Non-MSP/Reseller customers cannot purchase licenses directly and must go through an official MSP360 reseller.
Purchase User Licenses
Backing up Microsoft 365 and Google Workspace is licensed on a per-user basis. This means that you don’t need to purchase and assign licenses to all the users in the organization, but only to those you want to back up.
For MSPs and Resellers
Post-Payment model:
If you’re an MSP/reseller, the default payment model is post-payment. You can use the product first, and your usage will be billed automatically at the end of the billing period from your account balance.
How to Link Your Card to Your Account?
- Сlick the Account image in the top-right corner of the Management Console
- In the dropdown, select Payment methods
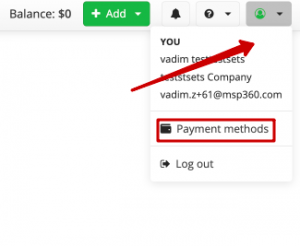
You will be redirected to the payment page, where you can choose one of the supported payment methods:
- Credit or debit card
- PayPal
- Google Pay
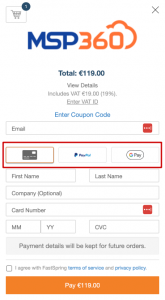
Fill in the required payment details and complete the transaction by clicking Pay or Place Your Order (for Google Pay).
Notes: A temporary $1.19 hold is placed to verify your card. It’s not a charge and will be released automatically.
How to Top Up Your Balance Manually?
To ensure your license purchases are successful, make sure your account balance has sufficient funds.
You can check your current balance in the top-right corner of the Management Console, next to the green Add button.
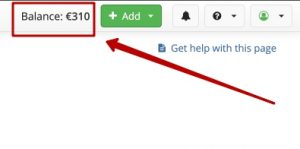
To add credits:
- Click the green Add button.
- In the dropdown, select Credit.
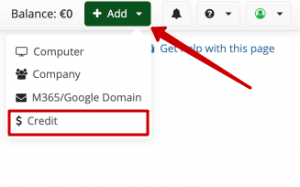
- In the Credits Value field, enter the amount you want to add.
- Click Buy.
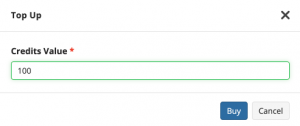
You will be redirected to the payment page, where you can choose one of the supported payment methods:
- Credit or debit card
- PayPal
- Google Pay

Fill in the required payment details and complete the transaction by clicking Pay or Place Your Order (for Google Pay).
Notes:
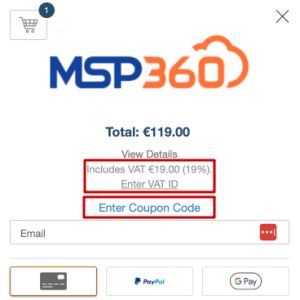
- VAT is automatically included by default. If you're placing an order on behalf of a company, enter your company's VAT ID in the Enter VAT ID field and click Submit.
- If you have a discount coupon, click Enter Coupon Code, add the code in the provided field, and click Apply to activate the discount.
- If you prefer pre-payment, contact your MSP360 account manager. Once enabled, you’ll be able to purchase licenses upfront using the following steps below.
Pre-payment model:
If your account is configured for pre-payment (If you it is not but you prefer, contact your MSP360 account manager) , you can purchase licenses in advance by following these steps:
- Click the green Add button in the top-right corner of the console.
- In the dropdown menu, select License.
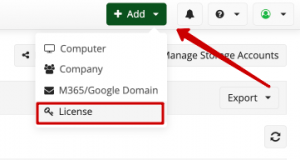
- Choose a Tab with Annual or Monthly plan
- Enter the number of licenses you need under Microsoft 365 / Google Workspace.
- Click Purchase to complete the transaction.
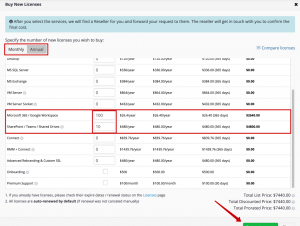
You will be redirected to the payment page. Select your preferred payment method:
- Credit or debit card
- PayPal
- Google Pay

Fill in the required payment details and complete the transaction by clicking Pay or Place Your Order (for Google Pay).
Notes:
- VAT is automatically included by default. If you're placing an order on behalf of a company, enter your company's VAT ID in the Enter VAT ID field and click Submit.
- If you have a discount coupon, click Enter Coupon Code, add the code in the provided field, and click Apply to activate the discount.
- Backing up shared drives, such as SharePoint, Teams, or Google Drive, requires a separate license that you can purchase the same way.
For Business Users (Non-MSP/Reseller Accounts)
If you manage backups for your organization and use MSP360 to protect Microsoft 365 or Google Workspace for your personal needs, you fall under the Business (Non-MSP/Reseller) account. In this case license purchase process works differently. You don't have a payment model (post- or pre-payment) by default. Licenses can only be obtained through an authorized reseller.
To request licenses:
- Click the green Add button in the top-right corner of the console.
- In the dropdown menu, select License.
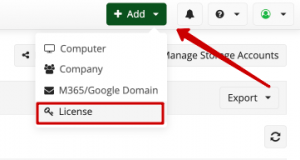
- Choose a Tab with Annual or Monthly plan
- Enter the number of licenses needed under Microsoft 365 / Google Workspace.
- Click Request a quote button.
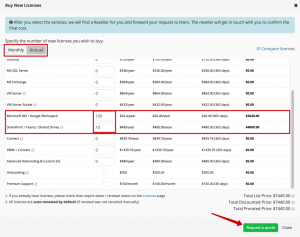
Once the request is submitted, an official MSP360 reseller will contact you to assist with purchasing and activating your licenses.
Note: Backing up shared drives, such as SharePoint, Teams, or Google Drive, requires a separate license that you can request the same way.
Set up Cloud Storage
To back up your data, you need cloud storage. You can use an existing storage account or set up a separate one for Microsoft 365 or Google Workspace.
To add a new storage account,
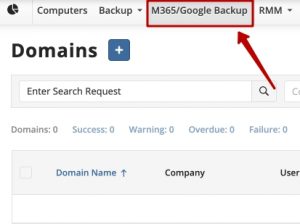
- Click the M365/Google Backup menu item
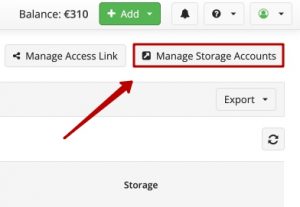
- Click Manage Storage Accounts button.
If you don’t have a cloud storage account — during the trial period, your account is automatically provisioned with 1 TB of MSP360 Storage Powered by Wasabi. It's ready to use out of the box. After the trial period you will need to add your storage or purchase the current one.
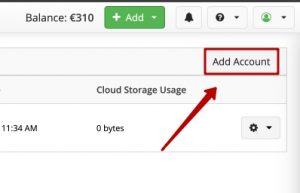
If you already have a cloud storage account, click Add Account to start the setup wizard.
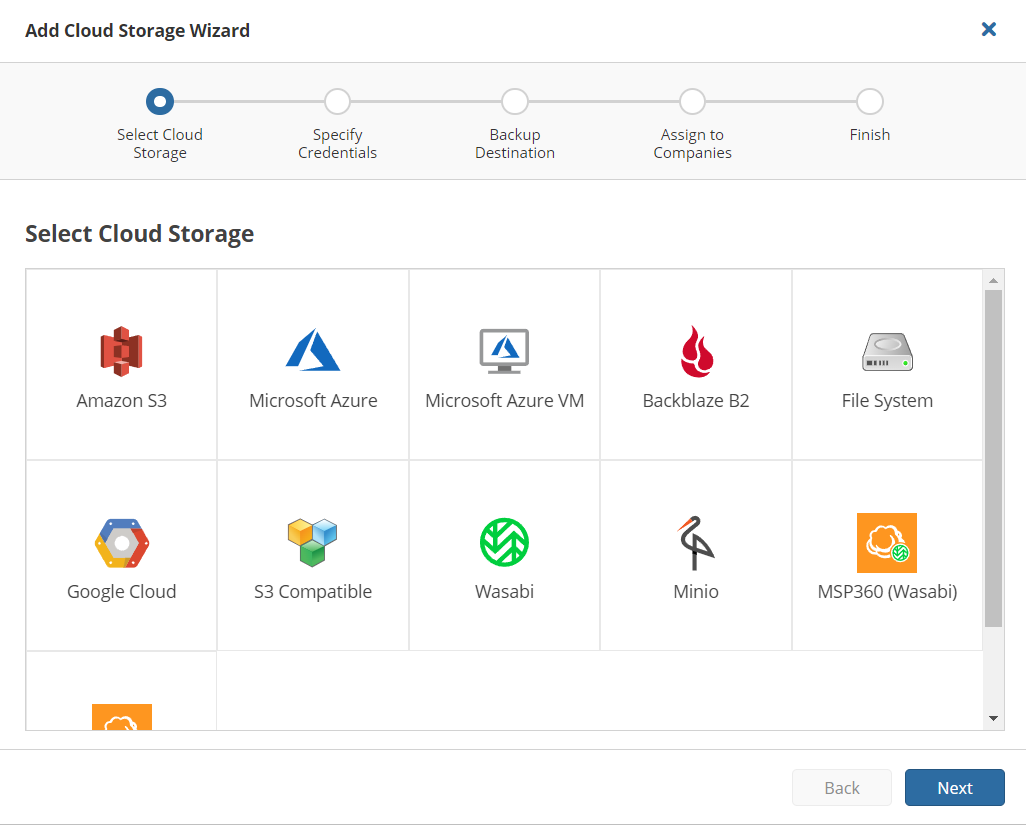
You will need to choose a storage provider and then to specify a bucket or container and provide access credentials. Refer to the Storage Providers documentation for detailed instructions.
Set up the M365/Google Backup Access Link
You and your customers will use a separate Service Dashboard to manage M365 and Google Workspace backups. To access this, you need to set up a domain alias, for example “acme” for acme.apps.mspbackups.com.
- Click the M365/Google Backup menu item

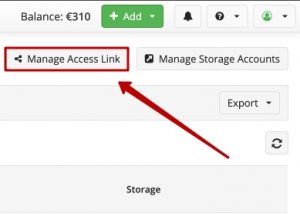
- Click Manage Access Link button.
- Add an alias and click the Save button.
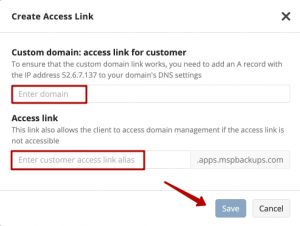
You can also use a unique link with your domain, set up a subdomain of your company’s domain, such as backup.acme.com, with the Advanced Rebranding & Custom SSL License. Learn more in the documentation on rebranding the dashboard.
Add a Backup Account
After you have purchased licenses, added a storage destination, and created a domain alias, it’s time to set up a backup account. Start by adding the domains or emails to back up.
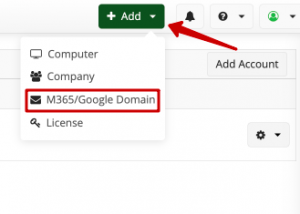
- Click the green Add button.
- In the dropdown, select M365/Google Domain.
- Domain(s): add the Microsoft 365 or Google account that you want to back up by specifying its unique domain name.
- Company: select the name of the customer organization.
- Backup Destination: select one of the backup destinations available to the company above.
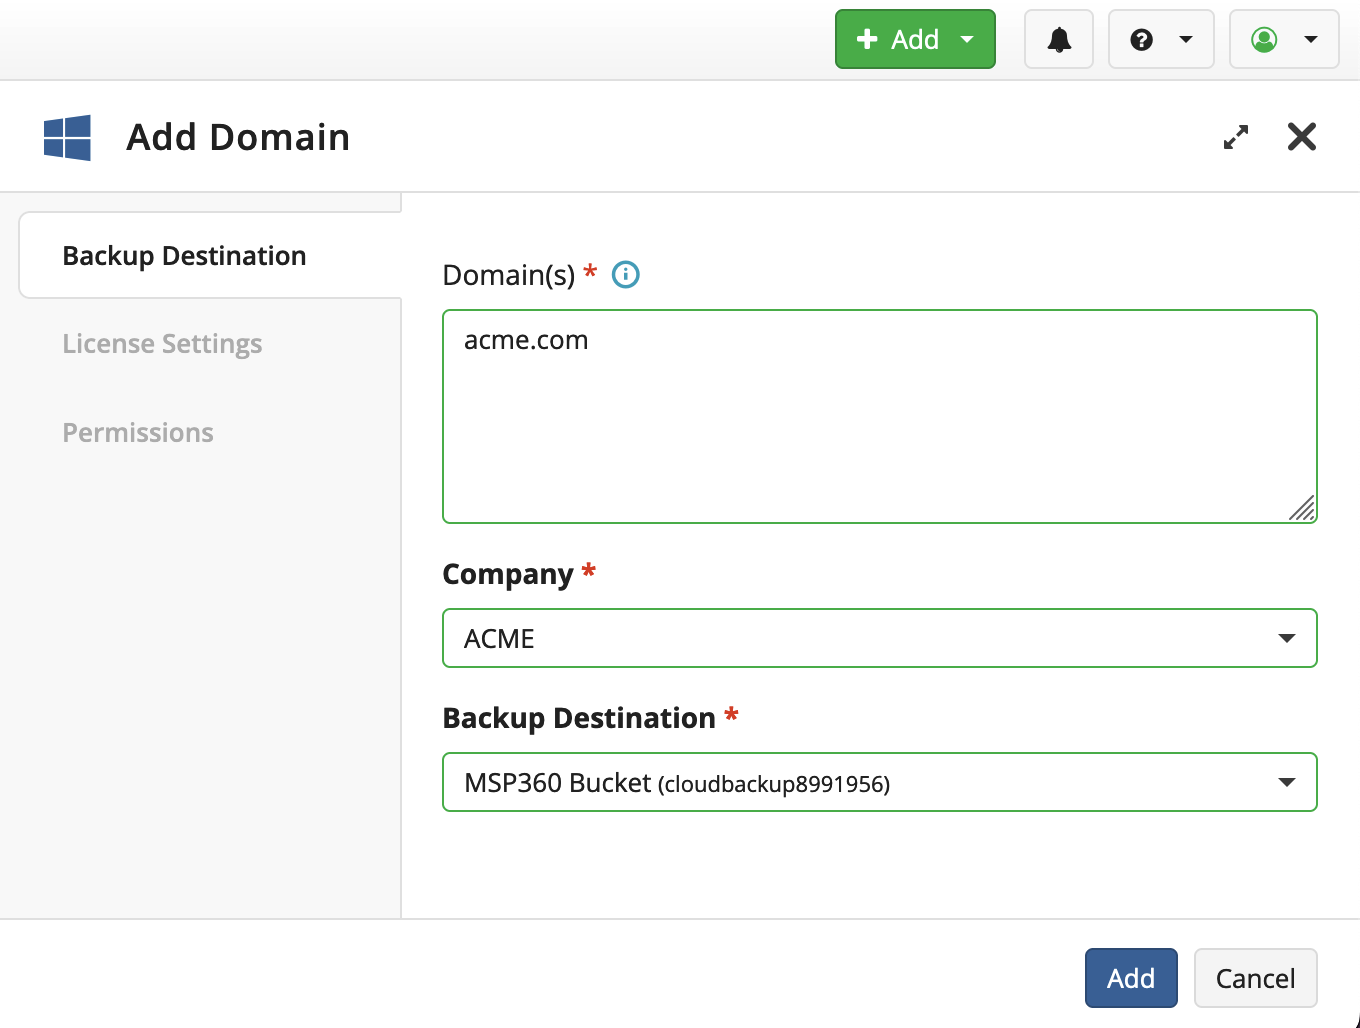
Once you’ve filled in all the fields, click the Add button. You will see the new domain in the table. Now you can edit the domain to change settings, such as license assignment rules and storage limits.
Further reading Top 6 Critical Mistakes in Microsoft 365 Data Protection
That’s it. Now you can configure your account in MSP360 Managed Backup for Microsoft 365 and Google Workspace. If you have any further questions, feel free to contact our pre-sales team.
Set up MSP360 Backup for Microsoft 365 and Google Workspace
With MSP360 Backup for M365 / Google, you can back up and recover emails, files, and other services under Microsoft 365 and Google Workspace accounts. This guide will help you prepare to back up your data: purchase licenses, set up storage destinations, and configure your MSP360 account. Continue reading
Retention Policies in MSP360 Managed Backup for M365 and Google Workspace
Retention policies are a vital part of your backup strategy. This guide will explain the purpose of retention policies and provide a step-by-step walkthrough on how to create, assign, and manage them in MSP360 Managed Backup for Microsoft 365 and Google Workspace.
How to Delete Data for M365/Google in MSP360 Managed Backup
Microsoft Office 365 and G Suite / Google Workspace are designed for unlimited numbers of users, and each user pool changes with time; new people are added and some are excluded. When you work with a company with one or both of these services in its IT infrastructure, one of the tasks you do regularly is deleting useless backup data – for example, when a user leaves this company or when you need to free up some space in the storage.
In this guide, we’ll cover the three ways to delete data from Office 365 and G Suite backups made by MSP360 Managed Backup for M365/Google. Here, we show the process for Office 365, but the process for G Suite is very similar.
Before we start, please note that to delete any data, you’ll need administrator rights. To avoid accidental purges, each time you delete something, you need to confirm your actions with the password of your alternate email. After confirmation, the deletion starts. You will be able to see it as a process in Task Manager. You can pause or stop it like a “common” process but data that has already been deleted at the moment of pausing or stopping it can’t be reverted.
Now, log into your account, <account_name>.apps.mspbackups.com, enter your credentials, and let’s begin.
Deleting Data from the Users Page
To delete data for a user or group of users, proceed to the Users tab. You will see a list of all your users. Select all of those whose data you want to delete. Above the list, click Delete Backup.

A slide-in will appear with a list of services. Choose all you want to delete, type the alternate email password and click Delete.
Please note: Sharepoint data is removed for the entire organization. This can be done by the global administrator only.

If you want to delete a user, there are two requirements:
- This user should be deleted from the G Suite / Office 365 users list (in the user list this one will appear with “deleted1” shown against in their name).
- All this user’s backup data should be deleted.
Select such users and you will see a Delete User option above the users list. Click it, confirm the deletion, and then hit Delete.

Service Pages
In MSP360 Managed Backup, each G Suite / Office 365 service has its own page where you can also delete all data you no longer need. To perform this, proceed to the page of the required service, choose a user in the top-left corner of the screen, select the data you want to get rid of (one or more items), click Delete, and confirm the deletion with your alternate email password to launch the removal process. Here’s an example for Office 365 (in G Suite, everything works similarly).

To delete a whole folder, choose it from the drop-down menu on the left, then open the Folder drop-down menu and select Delete Selected Folder.

Drive

To select multiple items, hold down the shift key. Bear in mind that if you delete a file or folder, all its revisions are removed.
Contacts

You can also delete a whole folder of contacts.

If a contact has several versions, for example, the phone number of a person has changed, you can delete older numbers by clicking Revisions near this contact, choosing the number that is no longer required, and hitting Delete.
Calendar
Here, the process is slightly different: choose the calendars that you want to delete and click Delete Selected.

You can also remove events from the calendar. Click an event and then hit Delete.

SharePoint
To remove any data from SharePoint, you need to be a global administrator. Otherwise, the deletion will be denied. On this page, you can also delete files or documents related to Teams, as it is backed up along with SharePoint data. Use shift for multiple selection if needed.

Deleting Data from the My Account Menu
You can erase all the G Suite / Office 365 data related to your user – the user whose credentials you enter when logging into the MSP360 Managed Backup Service console. Go to the My Account menu.

There, you can delete all the data from this account or the whole account with its users, preferences, backups, etc. Please note that this can’t be undone.

Conclusion
As you can see, in MSP360 Managed Backup, you have a variety of options to delete your G Suite / Office 365 backup data, both for the whole organization and granularly. You can easily keep your storage space under control and remove useless data in a timely manner. If you have any questions, please contact our team.
Recover Microsoft 365 and Google Workspace with MSP365 Managed Backup
With MSP360 Managed Backup for M365/Google, you can back up and recover mail, drives, and other services under Microsoft 365 and Google Workspace accounts. This guide will show you how to recover user data and shared resources from backups.
Back up Microsoft 365 and Google Workspace with MSP360 Managed Backup
With MSP360 Managed Backup for Microsoft 365 and Google Workspace, you can back up and recover emails, files, and other services under Microsoft 365 and Google Workspace accounts. This guide will help you start backing up user data and shared resources.
Continue reading

