

Many new MSPs quickly sign up for MSP360’s RMM Community Edition because of its attractive price (free!) and rich features. However, to truly get the most value from this RMM platform, it’s important to understand how to leverage its capabilities effectively in day-to-day operations.
In this guide, we’ll walk through practical tips and best practices for using MSP360 RMM Community Edition to manage client environments. From deployment and monitoring to patching and remote support, we’ll cover how MSPs can maximize the technical benefits of this free RMM solution while serving their clients efficiently.
This guide is intended for managed service providers (MSPs) – especially those using the free Community Edition of MSP360 RMM – who want to ensure they are utilizing all available features to maintain client systems proactively. If you’re an MSP admin or technician, read on for actionable insights into optimizing your RMM usage.
1. Streamlined Deployment and Onboarding of Client Systems
Getting started with MSP360 RMM Community Edition is straightforward, but a little planning can make onboarding new client machines even smoother:
- Use the Downloadable Agent or Script: The MSP360 RMM web console provides a ready-to-use installer for the RMM agent. You can either download the installer and run it on each client machine, or use the generated script to deploy the agent remotely. For mass deployment (if bringing on a client with many PCs), take advantage of the Discover and Deploy tool that can push the agent to multiple computers in a domain. This bulk deployment approach saves time and ensures all target endpoints begin reporting in quickly.
- Organize Endpoints by Client or Site: Once agents are installed, endpoints will appear in your RMM console (under the “Computers” section for RMM). It’s wise to organize them using grouping or naming conventions per client. MSP360 RMM allows you to tag or group computers, which can help when applying policies or running reports. For example, create groups for each client or for categories like “Client A – Servers” vs “Client A – Workstations”. This way, you can filter and manage settings for related systems together.
- Verify Agent Connectivity: After installation, ensure each agent shows as online in the console and is gathering data (CPU, RAM usage, etc.). If any endpoint is not reporting, use the remote deployment tool or manually reinstall as needed. Confirming connectivity at the start prevents blind spots in monitoring later on.
By thoughtfully deploying and organizing at the onboarding stage, you set a solid foundation for efficient monitoring and management as your device count grows (remember, the free edition supports up to 50 endpoints, so keeping them well-organized is feasible and beneficial).
2. Setting Up Proactive Monitoring and Alerts
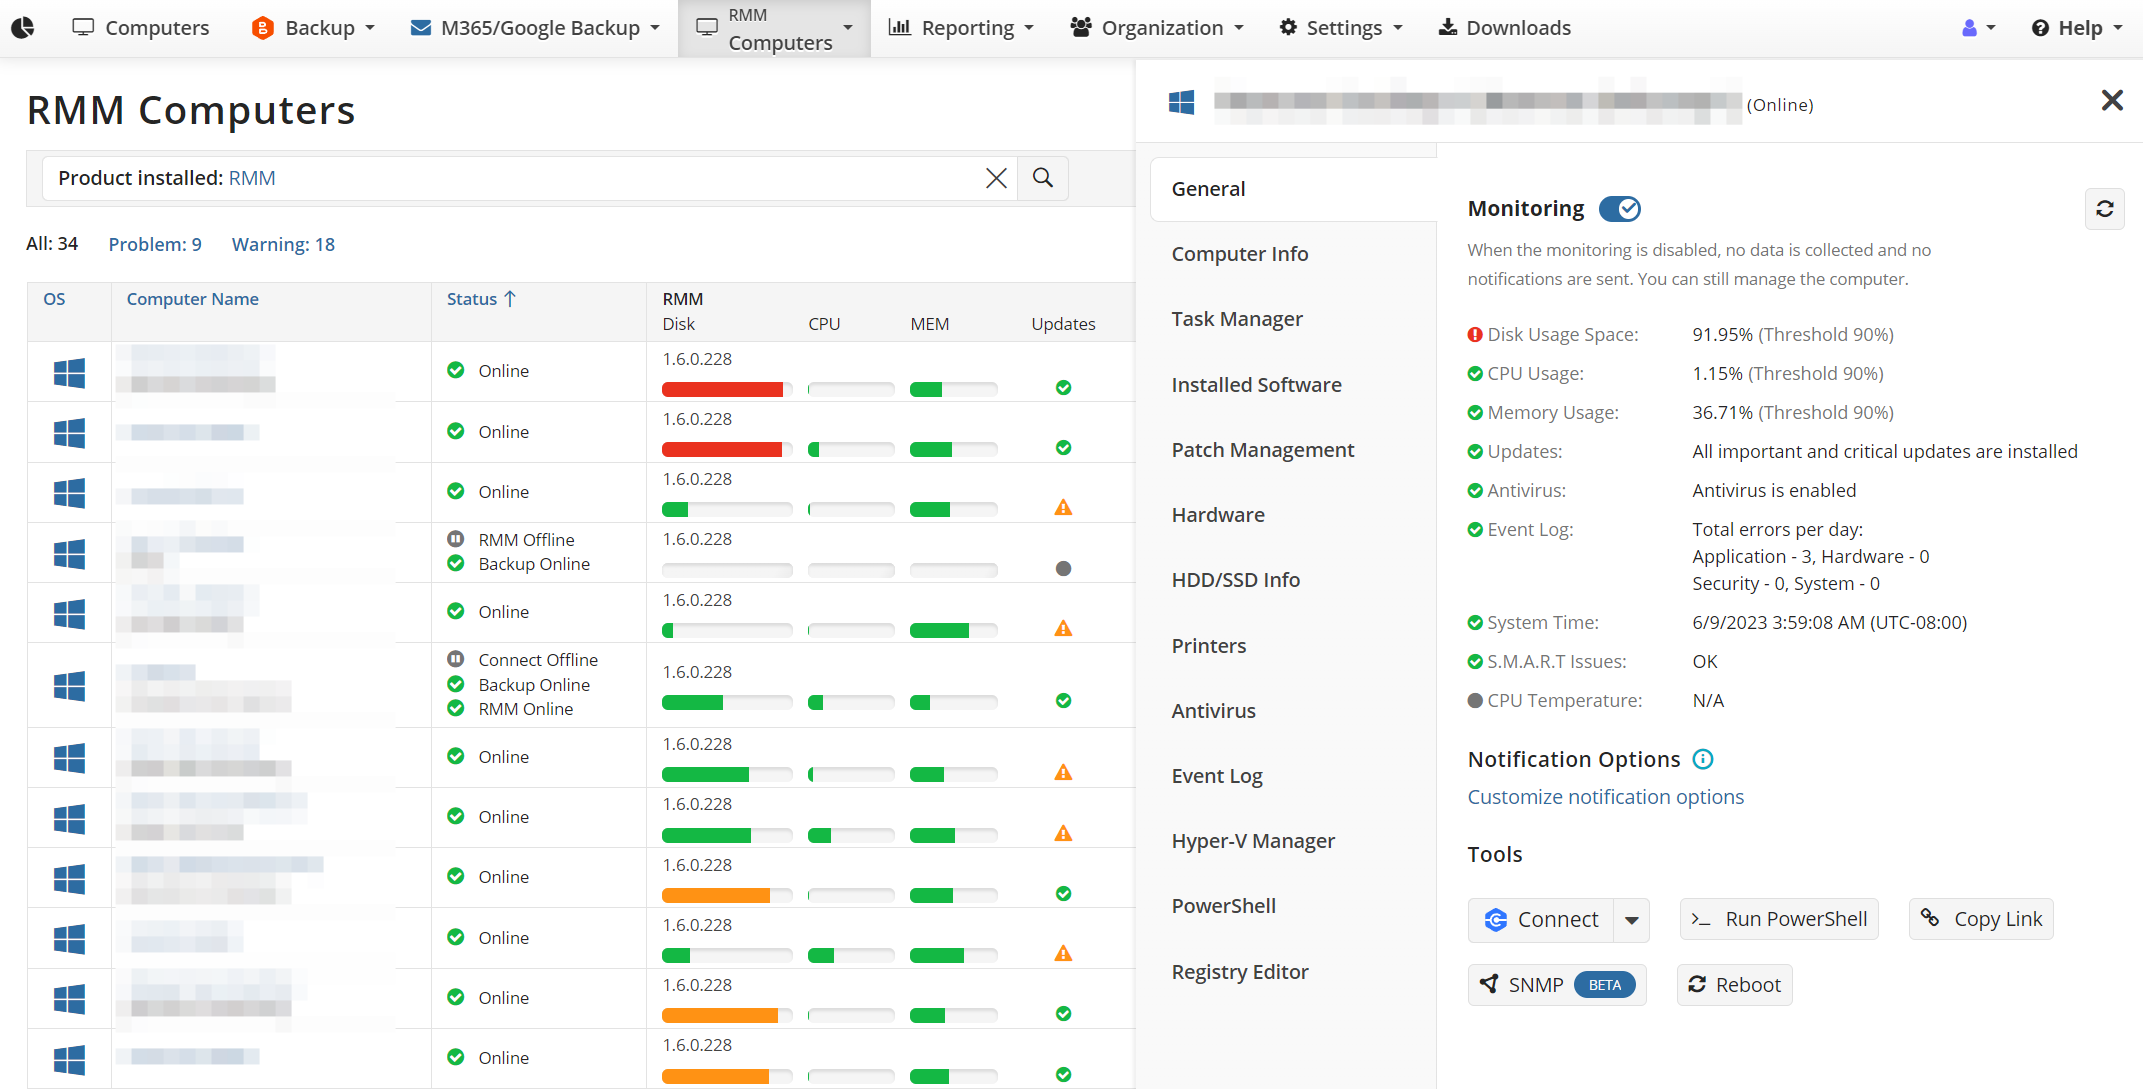
One of the core advantages of an RMM is continuous system health monitoring and the ability to receive alerts for any issues. MSP360 RMM Community Edition offers robust monitoring features out-of-the-box. To maximize their usefulness:
- Customize Alert Profiles: In the RMM console, configure alerting policies to define what conditions should trigger notifications. Common examples include high CPU or memory usage sustained over a period, low disk space (below a threshold), offline/ping failures, or specific Windows Event Log errors. MSP360 RMM allows you to set thresholds for these metrics and will display warnings on the dashboard and/or send email alerts. Tailor the alert sensitivities based on each client’s needs – for instance, a server might have a stricter uptime alert than a single PC.
- Leverage Built-in Antivirus and Event Monitoring: The platform can keep tabs on antivirus status and critical event logs on each machine. Make sure to visit the Antivirus tab for each endpoint in the console – here you can see if antivirus is running and up-to-date, and even update definitions remotely for certain AV products. Similarly, the Event Log tab provides a pie chart overview of system and security events. By regularly reviewing these, you can catch errors or security warnings that might not immediately surface as issues but could indicate brewing problems.
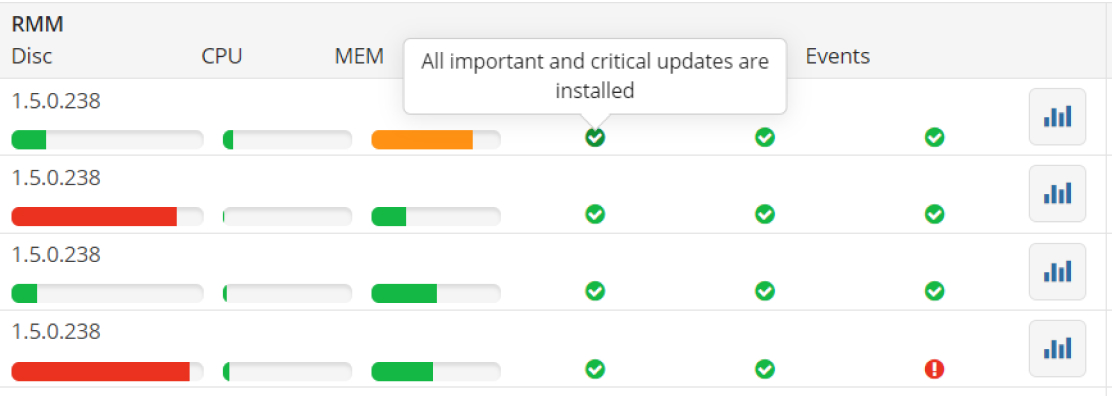
- Set Up Notifications: Decide how you’ll be notified of critical alerts. The Community Edition doesn’t come with 24/7 NOC services, so it’s up to you to monitor alerts. You might configure email notifications for high-severity alerts (e.g., server down, or failed backup if you integrate with backup alerts). Additionally, when you log in to the console, the dashboard will highlight any systems with issues (in red/orange) – so make it routine to check the RMM dashboard at least daily. Prompt response to alerts is key to preventing small issues from becoming big outages for your clients.
Effective monitoring is about finding the balance between too many alerts and too few. Fine-tune your alert profiles over time. Initially, you might get some noisy alerts – adjust thresholds or disable those that aren’t actionable. The goal is to have a RMM setup that reliably surfaces genuine issues for you to address, thereby improving your service quality to clients.
3. Automating Maintenance with Patch Management
Keeping client systems updated is critical for security and stability, but doing this manually for dozens of endpoints is not scalable. MSP360 RMM’s Patch Management feature is a huge time-saver that you should take full advantage of:
- Configure OS Update Policies: In the RMM console’s Patch Management section, you can view available Windows updates on each machine and install them remotely. Even better, you can set group policies for updates (e.g., automatically install critical updates on all workstations every Wednesday at 3:00 AM). Define maintenance windows that suit each client’s schedule – perhaps servers update on weekends, while desktops update overnight on weekdays. By scheduling regular patch deployments, you ensure systems are consistently up-to-date without needing constant manual oversight.
- Third-Party Software Updates: Aside from operating system patches, MSP360 RMM has the capability (through its Installed Software tab and integration with the WinGet package manager) to update third-party applications on Windows machines. This is extremely useful for keeping common software (browsers, PDF readers, etc.) updated across client PCs. Regularly check the Installed Software tab; any outdated applications can be updated en masse. You can even script certain application updates if needed.
- Test and Stagger Updates: As with any patching process, it’s wise to test updates on a few machines before rolling out to all. Although the Community Edition doesn’t have a dedicated test ring feature, you can simulate this by applying updates to one or two systems (perhaps your own or a non-critical client machine), then if all is well, proceed to the rest. Also, consider enabling automatic reboots after patching for workstations (with user notification) but perhaps schedule manual reboot times for servers so you can coordinate with clients. RMM gives you the remote insight – for example, you can see which machines require a reboot post-update on the dashboard.
Automating patch management ensures your clients’ systems are secure against known vulnerabilities and saves you countless hours of manual work. It’s a cornerstone of delivering proactive service, and MSP360 RMM Community Edition provides these capabilities at no cost, which is a major benefit to leverage.

4. Efficient Software Deployment and Asset Management
Beyond patching existing software, MSPs often need to deploy new software or keep track of what’s installed where. Here’s how to use RMM Community Edition for those tasks:
- Remote Software Deployment: The RMM console allows you to push software installers or scripts to install applications on endpoints. For example, if a client needs a new accounting application on all 10 of their PCs, you can automate that through RMM rather than visiting each machine. Simply upload the installer or script as a Group Action or run it via the remote PowerShell terminal in RMM. Community Edition supports running PowerShell scripts on remote machines (note: enabling two-factor authentication in your MSP360 account is required to use the PowerShell module for security). This powerful feature means you can script virtually any deployment or configuration and execute it across selected endpoints.
- Inventory of Installed Applications: In the Installed Software tab of each device, you have a real-time inventory of all software installed on that machine. This helps in multiple ways – you can verify if certain required applications or agents (like backup software, antivirus, etc.) are present and updated. It also helps you identify unauthorized software; if a user installed something that violates policy, you’ll see it in the list. Use this inventory during audits or client reviews to demonstrate software compliance, or to plan upgrade cycles for outdated software.
- Hardware and Asset Info: Don’t overlook the Hardware Info and Device Details provided by RMM. The platform can report on components like CPU model, RAM, disk drives, and even warranty-related info for some systems. Keeping an eye on this helps with capacity planning – e.g., noticing a server is low on disk space or a PC is due for a RAM upgrade. It’s easier to justify an upgrade to a client when you have the data at hand from your RMM tool.

By using MSP360 RMM’s deployment and inventory capabilities, you not only maintain control over the software environment of your clients, but you can also respond quicker to requests (like “Please install X on all our machines”) with a unified approach. It elevates your service efficiency and consistency.
5. Utilizing Remote Access and Support Tools
One of the most immediate benefits MSPs realize with an RMM is the ability to remotely assist clients. MSP360 RMM Community Edition integrates tightly with MSP360 Connect (remote desktop tool), allowing you to launch remote sessions directly from the RMM console. Here’s how to make the most of it:
- Remote Desktop Sessions: From the RMM dashboard or the individual device view, you can initiate a remote session to that endpoint with one click (the platform includes a Managed Connect license for this purpose). This means when a client calls about an issue, you can swiftly remote in to see and control their desktop to fix the problem – no separate remote support tool needed, it’s all in one console. Always ensure you have permission to connect (set expectations with clients in advance about remote support process).
- Background Tools: Sometimes you need to troubleshoot without disturbing the user. MSP360 RMM offers background access tools: for instance, the Task Manager tab shows running processes and services on the remote machine in real-time, and you can stop or restart services without initiating a full remote desktop session. The Registry Editor tab allows editing the remote registry, and the PowerShell tab (with proper authentication) lets you run commands invisibly. Using these, you might resolve issues (like killing a stuck process or checking a registry key) behind the scenes, which is less disruptive to end users.
- File Transfers and Other Utilities: While directly not a file transfer tool, by remoting in or using scripts, you can upload/download files if needed (e.g., retrieving a log file from the client machine for analysis). The integrated nature of RMM with remote access simplifies this – you don’t need the user to email large logs; you can just fetch it from their system. Also, the Wake-on-LAN feature in the console can power on sleeping machines in the client network (provided at least one agent is awake on that LAN), which is useful if you need to access a machine that’s turned off outside business hours.
By fully utilizing the remote access and background management tools in MSP360 RMM, you can drastically reduce on-site visits and resolve issues faster. It essentially gives you “hands-on” presence at the client site virtually, which is vital for MSP efficiency. Be sure to train your team on these features – knowing that, for example, they can restart a service via RMM without interrupting the user session can save a support call from turning into a more time-consuming incident.
6. Monitoring Your RMM Utilization and Planning for Growth
Since the Community Edition is free up to 50 endpoints, you should keep an eye on how close you are to that limit as your client list grows. The MSP360 RMM dashboard will show the total number of managed endpoints. Here are some tips as you approach the upper limit:
- Prioritize Critical Endpoints: If you are near 50 endpoints and not yet ready to upgrade, ensure the most important devices are under management. It’s better to have all servers and key systems monitored, even if that means perhaps leaving a few very low-priority PCs (like seldom-used kiosks) unmonitored until you upgrade. This triage ensures you’re using the free licenses where they matter most for alerting and upkeep.
- Evaluate Paid Plan Value: When you routinely need to add beyond 50 endpoints, it’s a success indicator for your MSP – congratulations, you’re growing! At that point, evaluate MSP360’s paid RMM plans. The paid version removes the endpoint cap and offers additional benefits like 24/7 premium support and advanced features for larger operations. Because you’ve been using the free edition, the transition is seamless – all your agents, settings, and data remain; you’re simply lifting the restriction and gaining new capabilities. Factor in the cost of the paid plan versus the revenue from new clients – you’ll likely find that the RMM software cost per endpoint is easily justified once you have a larger environment to manage. At that point, evaluate MSP360’s paid RMM plans, which are part of our broader MSP Software platform.
- Leverage Other MSP360 Services: As you grow, consider the broader MSP360 platform offerings which integrate well with RMM. For example, MSP360’s Managed Backup solution can be a strong addition, and it can be monitored through the same console. The familiarity you’ve gained on the RMM side will help in adopting their other services if needed, streamlining your toolset including Google Workspace managed services

Remember that the goal of the Community Edition is to support you until you reach a scale where a paid solution makes sense. By diligently using the free edition’s features to provide excellent service, you increase your chances of growth – at which time upgrading will be an easier decision, given the value you’ve already experienced.
Why you need the RMM Community Edition
MSP360 RMM Community Edition is a robust platform that, when used to its full potential, can dramatically improve how you deliver IT services to your clients – all without eating into your budget. By following the practices outlined above – from efficient onboarding and proactive monitoring to automated maintenance and speedy remote support – you can punch well above your weight as a small or new MSP. You’ll be providing a level of service professionalism that rivals larger providers, thanks in part to the comprehensive toolkit MSP360 has put at your fingertips for free.
The technical utility of MSP360 RMM Community Edition cannot be overstated: it centralizes and simplifies many tasks that MSPs traditionally find labor-intensive. The result is more consistent uptime and satisfaction for your clients and more productivity for your technicians.
If you haven’t yet taken full advantage of MSP360 RMM Community Edition, now is the time. And if you’re reading this but not using MSP360’s free RMM yet, consider this your invitation to join the community of MSPs who are transforming their operations with this solution. Start today by signing up for MSP360 RMM Community Edition and implement the tips from this guide. With the right approach, you’ll save time, reduce manual effort, and deliver top-notch service – all with a platform that costs you nothing until you’re ready to scale beyond 50 endpoints.
Start managing your clients’ IT systems at no cost, and position your MSP for success from day one. Get started now with MSP360 RMM Community Edition and take the first step toward scalable growth in your MSP journey!